HPC-T-Annotator

Web Interface Guide
Welcome to the user guide for the HPC-T-Annotator web interface. This guide will help you understand and utilize the features of the interface to configure and generate a customized software package for parallelization tasks involving annotation software. Follow the steps below to effectively use the interface.
The web interface consists of two panels:
- - The upper panel, dedicated to setting workload manager parameters, and
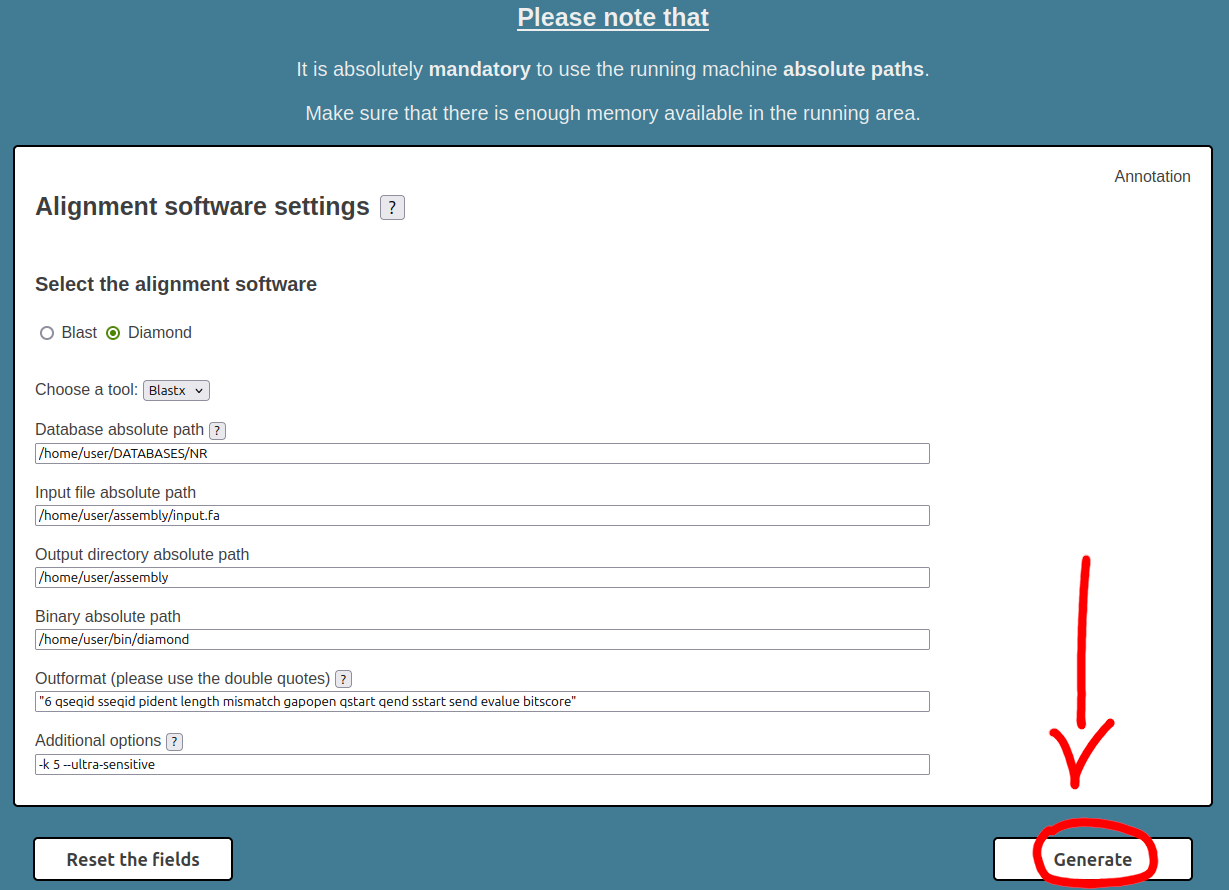
- - The bottom panel, for specifying the paths and parameters for the alignment software and the databases used.
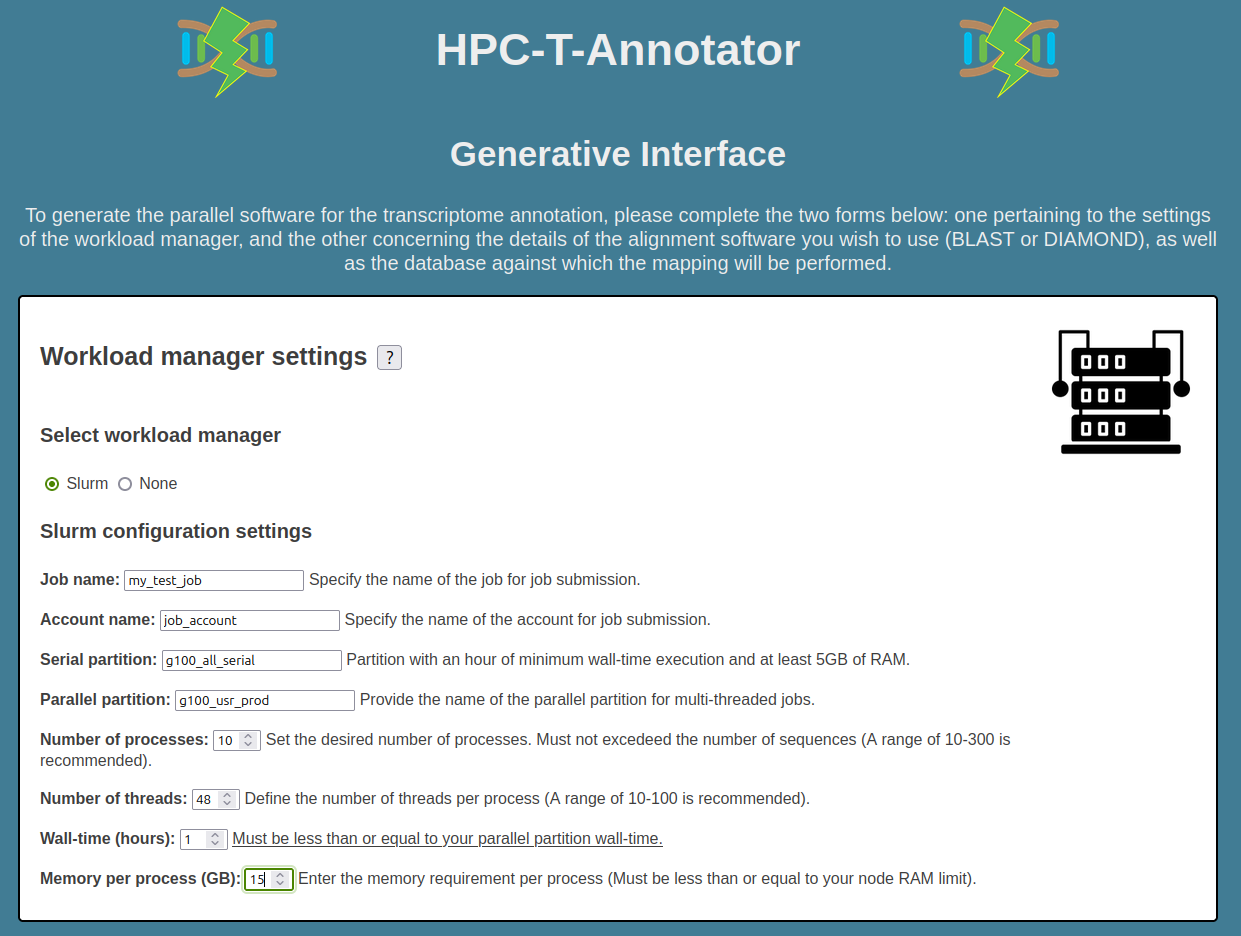
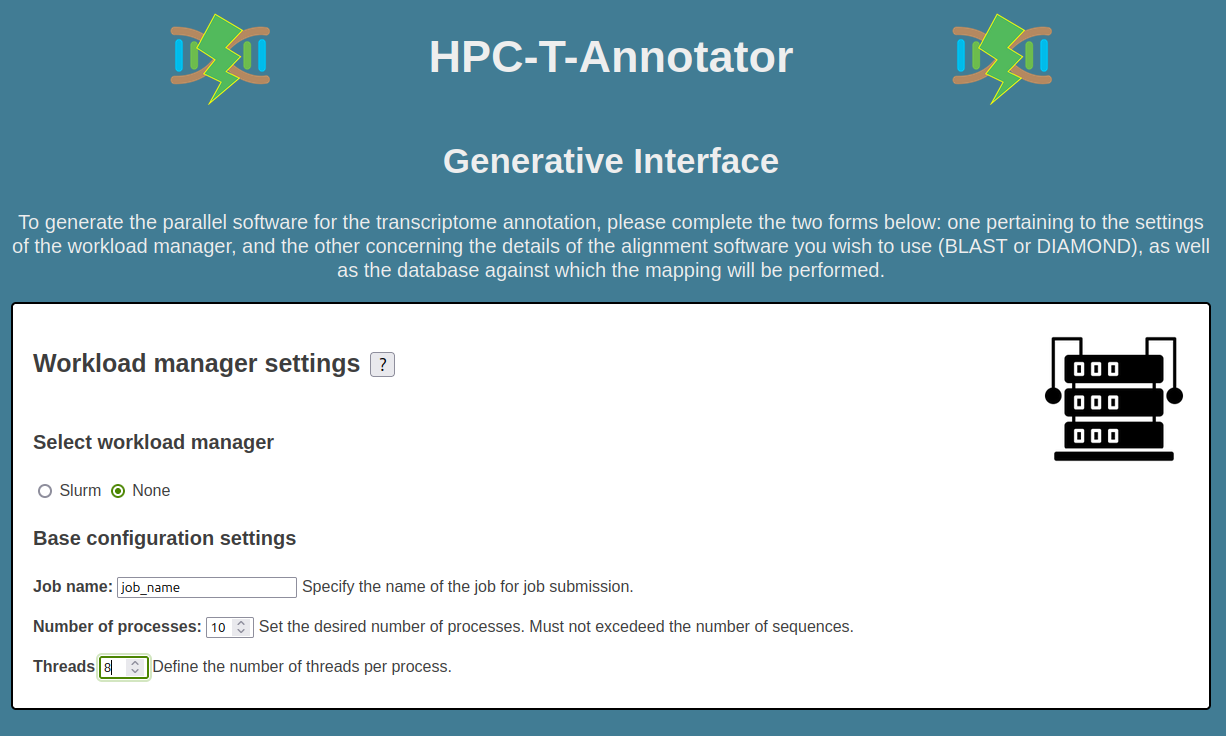
Here we show two examples of settings (scheduler SLURM, scheduler None) for the upper panel. Based on your selection, different configuration options will be displayed.
Step 1: Workload Manager Settings
Slurm Configuration Settings
Configure the settings for Slurm workload manager:
- - Job name: Specify the name of the job.
- - Account name: Specify the name of the account for job submission.
- - Serial partition: Enter the name of the serial partition for single-threaded jobs (you can also insert a parallel partition here).
- - Parallel partition: Provide the name of the parallel partition for multi-threaded jobs.
- - Number of processes: Set the desired number of processes. It must not excedeed the number of sequences (A range of 10-300 is recommended).
- - Number of threads: Define the number of threads per process. Must be less than or equal to your parallel partition threads limit.
- - Wall-time(hours): Specify the maximum duration of the job in hours. Must be less than or equal to your parallel partition wall-time.
- - Memory per process: Enter the memory requirement per process. Must be less than or equal to your node RAM limit.
Below is a screenshot as an example of the SLURM settings.

In the case where 'None' is selected in the upper panel, the parameters to be set are the following.
Base Configuration Settings
Configure basic settings when no workload manager is selected:
- - Job name: Specify the name of the job.
- - Number of processes: Set the desired number of processes. Must not excedeed the number of sequences.
- - Threads: Specify the number of threads for processing.
Below is a screenshot as an example of the None settings.

Step 2: Alignment Software Settings
In the bottom panel, the first step is to select the aligner to use (BLAST or DIAMOND). Once the software is selected, the following parameters need to be filled in the form:
- - Select an annotation tool: Choose either Blast or Diamond as annotation tool.
- - Choose a tool: Select the specific tool to use (e.g., Blastp or Blastx).
- - Database absolute path: Provide the absolute path to the reference database.
- - Input file absolute path: Specify the absolute path to the input FASTA or Multi-FASTA file for annotation.
- - Outdir absolute path: Specify the absolute path to the output directory.
- - Binary absolute path: Enter the absolute path to the annotation software binary.
- - Outformat: Define the output format for annotation results using double quotes (e.g., "6 qseqid sseqid...").
- - Additional options Enter any additional options that you would like to access and input any extra parameters required.
In note, for Additional options field, only options related to computation are accepted; options indicating the usage of threads and input/output file names are not accepted. So the options -p and -o for diamond or -out and -num_threads for blast are not accepted! Use this field to provide any additional command-line options or parameters for the annotation tool. These options should be entered as you would on the command line, separated by spaces. For example, you can specify parameters like "-evalue 1e-5 -max_target_seqs 10" for a BLAST execution.

Generating the Software Package
After configuring the settings for both workload manager and annotation software, you can:
- Click the Reset the Fields button to clear all entered data.
- Click the Generate button to create the customized software package.
Once generated, you can download the software package in TAR format.
The following step must be done on the HPC cluster.
Extract the TAR archive and run
After downloading the TAR archive (and, if you want, uploading the archive on HPC cluster) you have to unTAR the archive and then run the start script.
cd /path/to/myfolder/hpc-t-annotator
And the, if you are on HPC cluster with Slurm workload manager
Else, if you are on workload manager less architecture
Once the entire computation process has ended (check the general.log file for the status), the final result will be in tmp/final_blast.tsv file.
Some useful monitoring commands
Check that all jobs are finished
If all jobs are finished, you can check the logs by running this command:
That will display something like this:
Input file: ./input/input.fa
Processes: 300
Out-format: 6 qseqid sseqid pident length mismatch gapopen qstart qend sstart send evalue bitscore
Diamond: no
Tool: blastx
Binary: /g100/home/userexternal/larcioni/BLAST-2.14.0+/bin/blastx
Database: /g100_scratch/userexternal/larcioni/DATABASES/NR/blast/blast
Sequences: 36985
Average runtime: 8:35:38
Max runtime: 16:13:09
Min runtime: 3:36:23
Ending timestamp#2023-08-06 21:13:40
Total elapsed time: 05:51:38
Check for errors
You can check for jobs errors running these commands:
cat general.err
cat control.err
cat tmp/*/general.err